Thursday, May 31, 2007

Oh Toothfairy?!?

With the sprocket finally off (20 days after my first attempt) I was able to remove the cover of the left side final drive. I didn't have nearly as much butterscotch pudding in it as the right side. I pulled the bull gear out and examined all of the bearings. They all look like they need replacing. Not terrible, but pretty sloppy.


As I was scraping out the left-over grease I felt something at the bottom of the final drive case. Ugh, sizable metal chunks. I walked over to the bull gear and gave it a closer look - 70, 71, ahh - 72 where did you go? The bull gear is supposed to have 72 teeth. Those metal chunks were indeed a tooth. . .crap.

Heat, Spray, Walk Away. . .Repeat

You've got to be kidding me?!? I finally got those last two compresion retainers off and I grabbed hold of the sprocket and it was stuck. I took a hammer to it. I took a pry-bar to it. I kicked it. I put the pulley puller on it but it slipped off. I swore at it and that didn't help either.

Well, back to the old routine. Heat it up. Spray on some WD-40 and walk away. A couple of days later I got the pulley puller installed square and true. The puller got a good bite and after some pretty good tension - plop, off it came.

Sunday, May 27, 2007

Like Butter!

After a few days I went out to try those last two retainers again. I was getting my footing to gather all of the strength to clamp on the vice-grips when the grips slipped. . .I repositioned and squeezed down and again something slipped. Both of the remaining retainers were LOOSE. Heat, WD-40 and patience won the day.

Left-sprocket Surprise

After unsuccessfully attempting to get the sprocket off with a pulley puller; I was sitting there looking at that big sprocket pondering what to do next. I noticed something in the grease and started to scrap away the grease and dirt with a screw driver. At first I thought they were lock-washers but then I discovered there was something more. I got a vice-grip and was able to remove two of them. . .some sort of tapered compression retainer?

I only got two off and the other eight were not cooperative. Although they weren't threaded they had to be backed off of the stud like a nut AND they were tight just like a nut. My dad had been going through some of my grandpa's tools and brought me a box of odds and ends. In the box was a vice-grip with curved jaws. . .Curved jaws make a huge difference on a round item like these tapered compression retainers. Six more came off quite easily. Of course, the last two were going to go down with a fight. The end of this chapter has a familiar line: heat, spray, try, walk away - heat, spray, try, walk away - repeat. . .More to come.

Friday, May 25, 2007

Left-Side Sprocket - Not as Easy

The left-side sprocket appeared to be in much better shape. It actually had studs in it and it wasn't flopping around due to loose bolts. It was however loose due to some other unknown problem (probably bad bearings).

I got the nuts off without too much trouble and pulled on the sprocket to "slide it off" just like the right side. . .Not. It was stuck?!? What the heck? So I sprayed it down with WD-40 and pounded it on with a BFH ('special' type of hammer). Nothing.

Then I went to Fleet Farm for a pulley puller (did you know Menards doesn't have pulley pullers?). I had to rig up some chains because I couldn't get the pulley puller arms to reach or line up to get a grip. I got the chains (left over swing chains for the kids) in place and started cranking the puller tight. The chain links were starting to bend and that made me think for a minute. I put on my safety glass and three cranks on the wrench later - POP! A nut used to bolt the chains together flew off and landed about 10 feet out of the garage door. Safety glasses are meant to be worn - not hidden in a tool box drawer.
Side note: In the back of my mind I thought I had a pulley puller somewhere. I found it in a drawer after all of this work was done. I guess now I have two. . .


Right Side Sprocket

I finally got around to taking off the right side drive sprocket. It was the easy one because it was very loose because someone had replaced the studs with bolts and lock washers. As it says often in the discussion boards of http://www.cletrac.org/ never uses bolts and lock washers because they will not stay tight.
That advice is correct. The sprocket was loose because almost all of the bolts were loose. Therefore the holes on the sprocket are rather egged out from the sprocket flopping around. This caused me a bit of concern but I later discovered this can be managed (this will be explained in a later post).
I then went on to open up the final drive cover. I discovered about a half-gallon of "butterscotch pudding". It was some sort of nasty grease that had changed form over time. The final drives are supposed to be filled with straight 40W. Most bearings were in surprisingly good shape. The final drive bull gear had one of the old studs broke off in it. Hmm- that could be a challenge to get the old stud out and to re-stud the gear which has a few slightly reamed-out holes due to the loose bolts. We'll see how this goes in the future.

Surprise!!!

The next step was supposed to be working on those main drive sprockets. However, I decided I was sick of walking around, bumping into and being annoyed by the seat being in the way. I knew if I wanted to check on the transmission/differential case I need to take the seat off first, because it is bolted to the rear inspection cover. You may remember from an earlier post the trans/diff case yielded 1.5 gallons of water when I pulled the drain plugs.
So with the seat off I pulled the 10 bolts and removed the rear trans/diff inspection cover. And, SURPRISE!!! I had noticed the large beads of weld on top of the trans/diff case when I bought the crawler. However, I thought two things. Maybe the welds were part of a seat modification. The seat on it now is not the original. The original seat mounted to the top of the trans/diff case. And/or there were some cracks and these were welds meant to fix the cracks.
I could have never predicted the carnage that was hiding behind the cover. The pictures show two threaded bolt holes that are totally blown out and the other picture is an up and under shot that shows an absolute jigsaw puzzle. Ugh.
I posted this experience on http://www.cletrac.org/ and I had a couple of guys offer to sell me a new trans/diff case for rather high prices and the shipping from their locations (the other side of the US) would have been outrageous.


A week or so later a retired sheriff from a town about 45 minutes away asked me to give a call. He had a trans/diff case. Mike is a real nice guy that has been restoring his OC-3 for two years. He has a HG (the earlier near identical predecessor of the OC-3) that he bought for parts. He's taken about all the parts he needs. He offered me the trans/diff case for a real good price and he has quite a few other parts to offer. I haven't been over to see Mike yet - life has been real busy but he will be getting a visit soon.

I'll probably buy the trans/diff case and put it on the shelf. I'm not too excited about taking the differential gears out and rebuilding it all again in a new case. I'm thinking about using a bunch of JB Weld to build up the threaded holes and "letting her buck" (a term we used often at Green Giant).

In conclusion I still look at all of the damage and cannot figure out how or why the damage occurred. A mystery that will probably never be solved?

Bushings & Bearings


Before tackling the drive sprockets I decided to take a look at the front idler wheels. Yep, they are booth in need of new bushings. Bushings & Bearings will be a reoccurring theme.

Track Frames Off!

In order to get at the sprocket you need to take the track frames off. They are the long yellow iron frames that run the length of the crawler. This did not go well. There are two ways to take the track frames off. Both options involve large nuts (1-1/4 & 2 inch) that are tight, dirty, rusted, and beat-up from 50 years of work. I have a 24 crescent wrench and put a 4 foot pipe on it for leverage. I could jump up and down on the pipe and nothing moved.

So I soaked things down with WD-40 (I need to make a trip to town for the good stuff: Knocker Loose, Liquid Wrench, etc.). and I would come back and try again. I tried something I heard about in Farm Show magazine http://www.farmshow.com/. It involves heating up the suspect nut and then putting candle wax on it. The theory is as the nut cools the wax gets sucked into the threads and thus gets between the rust and metal and lubricates. NO SUCH LUCK.

I don't have a full-blown torch, just a propane bottle torch used for plumbing. However, I continued to use it to heat the area and let the WD-40 suck into the threads. Finally, with the help of my next door neighbor (he had a large wrench as well) the big 2 inch nut gave way. This allowed me to pull the long connecting rod that goes across the machine and both track frames dropped to the ground after ten minutes of grunting and pulling. Then you simply roll the track frames ahead and out of the way on your previously laid out tracks.

Tracks Off!

I read on-line that some folks have had great luck getting the tracks off and some folks have gotten their excercise pounding on the master pin.


I was fairly lucky. The master pins on both tracks came out fairly well. I was able to get both tracks off in about 40 minutes. Most of that time was spent getting some tie-down straps in place so I could let the tracks down in an orderly fashion - without taking a finger off.

Up on Blocks

Upon further inspection (beyond just changing the fluids) I learned that both main drive sprockets were loose. I had read on-line that the stub shafts that these sprockets ride on can get loose and that is what inspired me to grab hold and give them a shake.

To find out the cause of the sprocket wobble I would have to take the tracks off. To take the tracks off I would have to jack up the crawler. The empty weight of the OC-3 (without blade) is around 3700 lbs. The frame has a clearance of 20 inches and is about 18 inches wide. I soon learned getting it up off the ground and safely in place was going to be a bit of work. After two trips to Fleet Farm for some concrete blocks and creative use of my 3 ton floor jack I got it up in the air.

Side Note: Since that time I have taken a lot more heavy parts off the crawler and have in turn changed the center of gravity. I've had to reposition the concrete blocks a couple of times because I noticed the crawler would start to look like a teeter-totter after I would take off a couple hundred pounds of hardware.

Tuesday, May 22, 2007

Into the Garage

So, I got the 
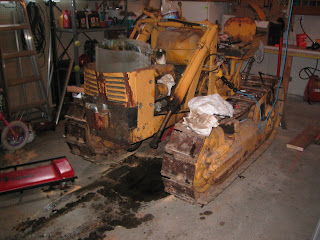
OC-3 into the garage and slowly started giving it an inspection. I usually only worked on it for 45 minutes to an hour a few nights a week. After we got the kids into bed, I would go out and tinker. The first order of business was to drain the fluids. I tackled the engine oil first. It was filthy black but other than that it wasn't remarkable.

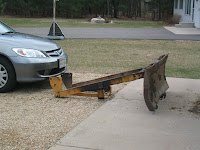
What was remarkable? The blade had to go away for awhile. Crawling around, up and over the blade was getting old. If serious work was to be done - the blade had to seriously go. . . (notice the puddles of oil on the floor because I was too busy crawling over the blade and frame to get to the pan in time).

Removing the blade took longer than I thought it would. In the end it came off with all of the framework that bolts all the way back to the drawbar. I dragged it out of the garage moving it 6-8 inches at a time and my back was sore the next day (see picture). Eventually the blade was winched up onto the snowmobile trailer and dropped in the tree-line out back. I'm sure the neighbors appreciated me cleaning up the miscellaneous scrap iron.

As the inspection continued eventually the hood came off as well as the fenders in an effort to access and see things a little better. At some point I decided to start wearing my old Green Giant bump cap when working on the beast. While crawling around and under I banged my head twice - the type of head banging that makes you stop and take in a breath to keep yourself from crying. . .Everything on this machine is big, heavy and it does not give way for your melon.

By taking the blade off, access to the drawbar was readily available. It had to go as well - so I could get to differential/transmission drain plugs. The drawbar like everything else is heavy - I'm guessing about 80 pounds. Note to self: Put it somewhere where you can't trip on it or break a toe.

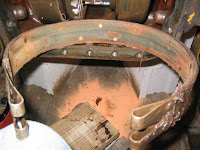
The next fluid to be changed was the transmission/differential case. It is supposed to hold 2 gallons of GL-1 gear lube (80-90w). I got to learn a bunch about GL-1. GL-1, to borrow a tomato term, is an "heirloom" oil. Modern gear lube is GL-5 (you even see some GL-6 out there) and it has been infused with additives and hypo-additives. These things are great for modern equipment but they cause problems for the cotton-woven break bands that are used to steer the OC-3 (see picture). GL-1 is not easy to find and after making stops at all but one place in town I found GL-1 at the Tractor Supply Company (2 gallons for $25). They list it as Ford 2N, 8N, 9N gear lube. Apparently the Fords use it in their trans/diff case?

With GL-1 in hand I felt ready to drain the trans/diff case. I pulled the plugs and got 1.5 gallons of water and about a quart of sludge after the water came rushing out. I'm not talking milky oil - I'm talking WATER. Well, that made me wonder - eventually I would need to pull the rear trans/diff cover to take a look. . .that was a job for another day.
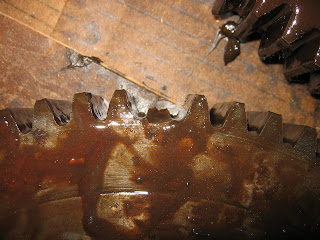
A Detour before Going to the Garage. . .

After a couple of weeks in the shed I decided it was time to bring the OC-3 out of the shed and to the garage for its check-up. Spring had sprung so there was no problem with parking one car (my car) outside while the crawler took up a stall (3 days later it snowed about 4 inches and I had the ice scraper out that morning).

Before I ventured to the garage I just couldn't resist taking a stab at a small dirt pile I had out back. I soon realized the blade is not one of those fancy see-through plastic blades you see on pick-ups during the winter. If it was see-through I would have seen my septic system vent tube was about to get clobbered. The OC-3 was not kind to the 4 inch PVC tube - there was a sharp POP and pieces flew everywhere.

I didn't let the PVC incident stop me and I continued on to the dirt pile. The old girl pushed a fair amount of dirt at 3/4 throttle. She even spun the tracks. I was somewhat impressed that this machine of 50+ years of age could grunt down and spin the tracks.

However, it also verifies what the critics of the OC-3 have said for years. . .It is geared too high for serious dirt dozing. I will certainly keep my eyes open for the remedy - the Ford Model A 3-speed step-down transmission. The Model A 3-speed is bolted between the engine/clutch housing and the original 3-speed Clark transmission. This takes you from 3 forward speed to 9 forwards speeds. Ultimately, it takes you from 2.02mph in 1st gear down to 0.64mph in super-low 1st gear. Then you can really capture all 26 horses from the little Hercules four-cylinder. Oliver actually offered this transmission (made by Trasco) as an install option in the mid-50's. People are still installing these transmissions today - so if I find a well-priced Model A 3-speed, you know I'll have to buy it. http://www.cletrac.org/pages/auxtrans.html

Tuesday, May 1, 2007

Back to the Beginning


It was a Thursday evening and my wife sent me to the grocery store with a list of things to pick up. I cruised up and down the aisles and completed my grocery goals. While in line to check out I saw it waiting for me, my 25 cent guilty pleasure - The Trading Post, a local weekly collection of printed classified ads. Anything and everything is in The Trading Post.

I got home and with a busy evening ahead didn't sit down with The Trading Post until several hours later. My favorite section - section 8, tractors. A lot of the same old stuff, Ford 8N's, John Deere this - John Deere that, and finally the Olivers. . .There it was "Oliver OC-3 with dozer blade, runs and steers good". It had a 715 area code (usually the good stuff is on the other side of the state). I ran a reverse phone look-up http://www.whitepages.com/reverse_phone and it was a cell phone from Black River Falls. It was hard to sleep that night. I called the next day and it was still there (that never happens). I went to work, I had planned on knocking off early that Friday. I skipped out a little earlier than planned and went for a drive.

I found the place and met the owner. He started it up drove it around a little bit and then I had my turn. This was my first time driving a crawler. The most fun you can have at 2mph. Everything did work and I looked it over the best I could. . .I had read up on crawlers and thought I knew what to look for - I didn't, and that is at the core of the rest of the posts on this blog. I left the place knowing someone else was coming to look the next morning. I said, "If the guy doesn't buy it give me a call."

10AM the next day (Saturday) the phone rang. The other interested party didn't buy it. I said I'd have to run some numbers and I'd get back to him. Two hours later I was on the phone and we had a deal.

On Sunday evening I jumped in a pick-up with a very generous and helpful acquaintance that I had met once before. He had a Dodge V10 with a 6 speed and goose neck trailer. The second time I ever drove a crawler was backing up the ramps of a very high goose neck trailer. Let's just say people pay for thrill rides like that at the county fair. . .and 50 year old crawlers don't drive like Bobcats. . .

We got her home after about an hour of driving (the Dodge didn't even know it was back there). It came down the trailer with ease and less drama. . .I got it in the shed and all was well. . .Happiness is a new OC-3 in your shed.